How to make a pair of 10/12mm
blacksmith tongs with limited tools

In this post, I will be giving out a simple
guide on how you can make a pair of
10 or 12mm, square and round,
blacksmith tongs. This is one of the
first style of tongs I learned to make
and I basically switched the steps
around so you can make these
without having a pair of tongs to
make them.
What you will need to make these tongs:
First, you will need your heat source to
get the metal hot, your hammer and
anvil.
Other things you will need is a
vice (something else might work,
will explain when we get there).
You will also need a drill/drill press.
You will also need a drill/drill press.
And then a quick disclaimer before we start.
Don't do anything from this post if you
don't feel comfortable doing it, there is plenty of ways to
hurt yourself forging, so always use your eyes and head
and use proper safety equipment.

For this project, I will be using 12mm square bar. Just use
a fairly long piece maybe 50-60cm so you can heat
one end and hold the other.


First off we want to draw out the handle part of the tongs.
Just work on a rounded edge of your anvil to draw it
out quicker.

 You want to draw the tongs out to a taper heightwise and
about 6mm thick/wide all the way. When you are starting to
Don't do anything from this post if you
don't feel comfortable doing it, there is plenty of ways to
hurt yourself forging, so always use your eyes and head
and use proper safety equipment.

For this project, I will be using 12mm square bar. Just use
a fairly long piece maybe 50-60cm so you can heat
one end and hold the other.


First off we want to draw out the handle part of the tongs.
Just work on a rounded edge of your anvil to draw it
out quicker.


about 6mm thick/wide all the way. When you are starting to
get closeto the shape you wanna keep hammering down the corners. This will make sure the handles end up
rounded and comfortable.

At this point, I have about 300mm draw out for the handles.

And I will cut this off at about 400 mm.


Now I mark around 50 mm from the end, hold the workpiece
about 45 degrees like in the picture and give it one good hit
to make a mark.

Now just flatten it down to about 6mm or half the thickness of the
full material.


You should end up with something like this.

Now we want to start spreading out the part that will be turned
into the jaw.

Flatten it down to around 4-5mm.


At this point the jaw part is about 25x60mm, don't need it
to be this long but I'll cut it shorter later

To fold the jaws together I just placed it on my vice and
hit it with the straight peen of my hammer to
start the fold

Then I close it un on the anvil face and use the straight corner of
my anvil to get the inner angle about 90 degrees

Something like this, it does not have to be perfect at this point.
We will adjust this at the end

Here I just marked and cut the jaw a bit shorter


If something ends up a bit twisted(like one of the jaws for me)
just heat it up clamp it on a vice and use something
like an adjustable wrench to twist it back to strait

And you will need 2 of these pieces as Identical as you can
rounded and comfortable.

At this point, I have about 300mm draw out for the handles.

And I will cut this off at about 400 mm.


Now I mark around 50 mm from the end, hold the workpiece
about 45 degrees like in the picture and give it one good hit
to make a mark.

Now just flatten it down to about 6mm or half the thickness of the
full material.


You should end up with something like this.
Now we want to start spreading out the part that will be turned
into the jaw.

Flatten it down to around 4-5mm.


At this point the jaw part is about 25x60mm, don't need it
to be this long but I'll cut it shorter later

To fold the jaws together I just placed it on my vice and
hit it with the straight peen of my hammer to
start the fold

Then I close it un on the anvil face and use the straight corner of
my anvil to get the inner angle about 90 degrees

Something like this, it does not have to be perfect at this point.
We will adjust this at the end

Here I just marked and cut the jaw a bit shorter


If something ends up a bit twisted(like one of the jaws for me)
just heat it up clamp it on a vice and use something
like an adjustable wrench to twist it back to strait

And you will need 2 of these pieces as Identical as you can
get them. You can jsut make one after the other but the better way is to do one step at a time on each

After I got bout pieces the way I like them I file them a bit
smoother where the hinge will be, just makes them work a
bit smoother and better.


Just placing them together on top of each other I have a bit big
of a gap next to the hinge.

To close up this gap I straighten out the bend in the hinge a bit
and make sure the jaw is in the same line as the
handles.

The mak the first part, drill and deburr it.

Put it on top of the other part and mark the
second part true the hole and drill it


To know how long you want the rivet to be, just put
it true the material and the part that sticks out you
want to be 1,5 x rivet diameter, in this case, the the
rivet is 6mm so we want 9mm to stick out.

I like to use something soft like this piece of copper to not
totally flatten the rivet head, this is not necessary but
I just prefer to do it.

And with the river finished we want to do the final adjustment to
the tongs before they are ready.

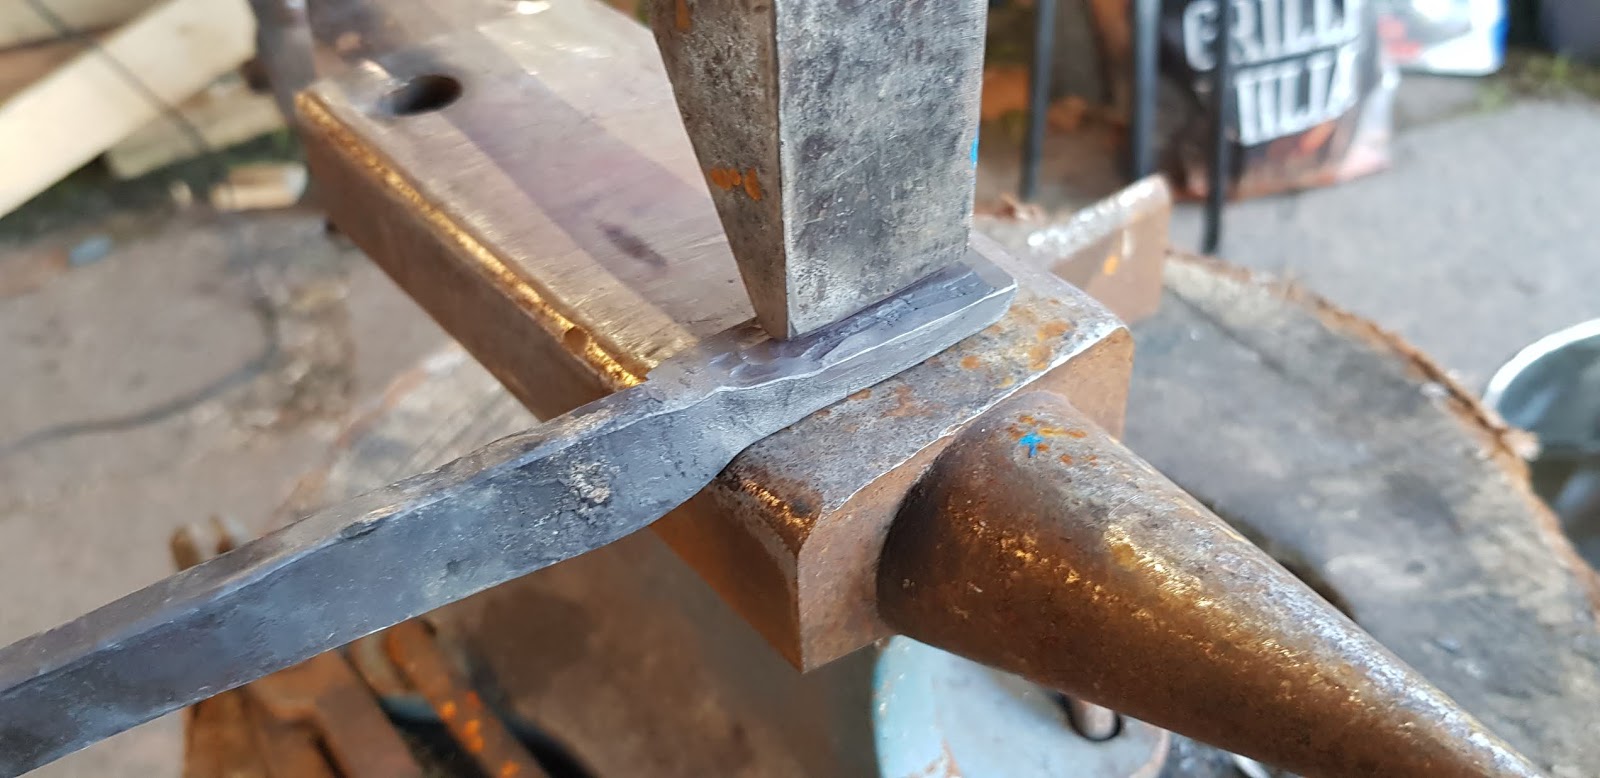
This is the setup for adjusting your tongs. Just hold any
small hammer in your hand so that the handles of
the tongs are as far apart as you want them.
Then put a piece of material, in this case, 10mm square bar
in the jaws. Now just hammer the jaws together
and shape them around the material.

And after some cleaning up of the jaw tips and a touchmark
the tongs are ready to go.
I made these for 10mm stock because I wanted a pair
but if it is your first pair I would recommend making
them for 12mm so you can use them to make
more tongs using them. Quite a few styles that can
be made from 12mm square stock.
Once again thank you for reading and I hope you
get some use out if this. As usual, if you have any
questions, requests or tips just leave a comment!

After I got bout pieces the way I like them I file them a bit
smoother where the hinge will be, just makes them work a
bit smoother and better.


Just placing them together on top of each other I have a bit big
of a gap next to the hinge.

To close up this gap I straighten out the bend in the hinge a bit
and make sure the jaw is in the same line as the
handles.

The mak the first part, drill and deburr it.

Put it on top of the other part and mark the
second part true the hole and drill it


For the rivet, I use one of theese 6mm steel rivets
that already have a head on them.
However, you cud use a large round nail or jsut a
piece of 6mm rod tht you heat one end, clamp it
in a vice and hammer a head on it.

To know how long you want the rivet to be, just put
it true the material and the part that sticks out you
want to be 1,5 x rivet diameter, in this case, the the
rivet is 6mm so we want 9mm to stick out.

I like to use something soft like this piece of copper to not
totally flatten the rivet head, this is not necessary but
I just prefer to do it.

And with the river finished we want to do the final adjustment to
the tongs before they are ready.

This is the setup for adjusting your tongs. Just hold any
small hammer in your hand so that the handles of
the tongs are as far apart as you want them.
Then put a piece of material, in this case, 10mm square bar
in the jaws. Now just hammer the jaws together
and shape them around the material.
And after some cleaning up of the jaw tips and a touchmark
the tongs are ready to go.
I made these for 10mm stock because I wanted a pair
but if it is your first pair I would recommend making
them for 12mm so you can use them to make
more tongs using them. Quite a few styles that can
be made from 12mm square stock.
Once again thank you for reading and I hope you
get some use out if this. As usual, if you have any
questions, requests or tips just leave a comment!
Inga kommentarer:
Skicka en kommentar